[100-Day AI bootcamp] Day 2: Building a Real-Time Chatroom with Django
![[100-Day AI bootcamp] Day 2: Building a Real-Time Chatroom with Django](https://growgrow.s3.us-east-2.amazonaws.com/media/blog_images/4201736241999_.pic.jpg)
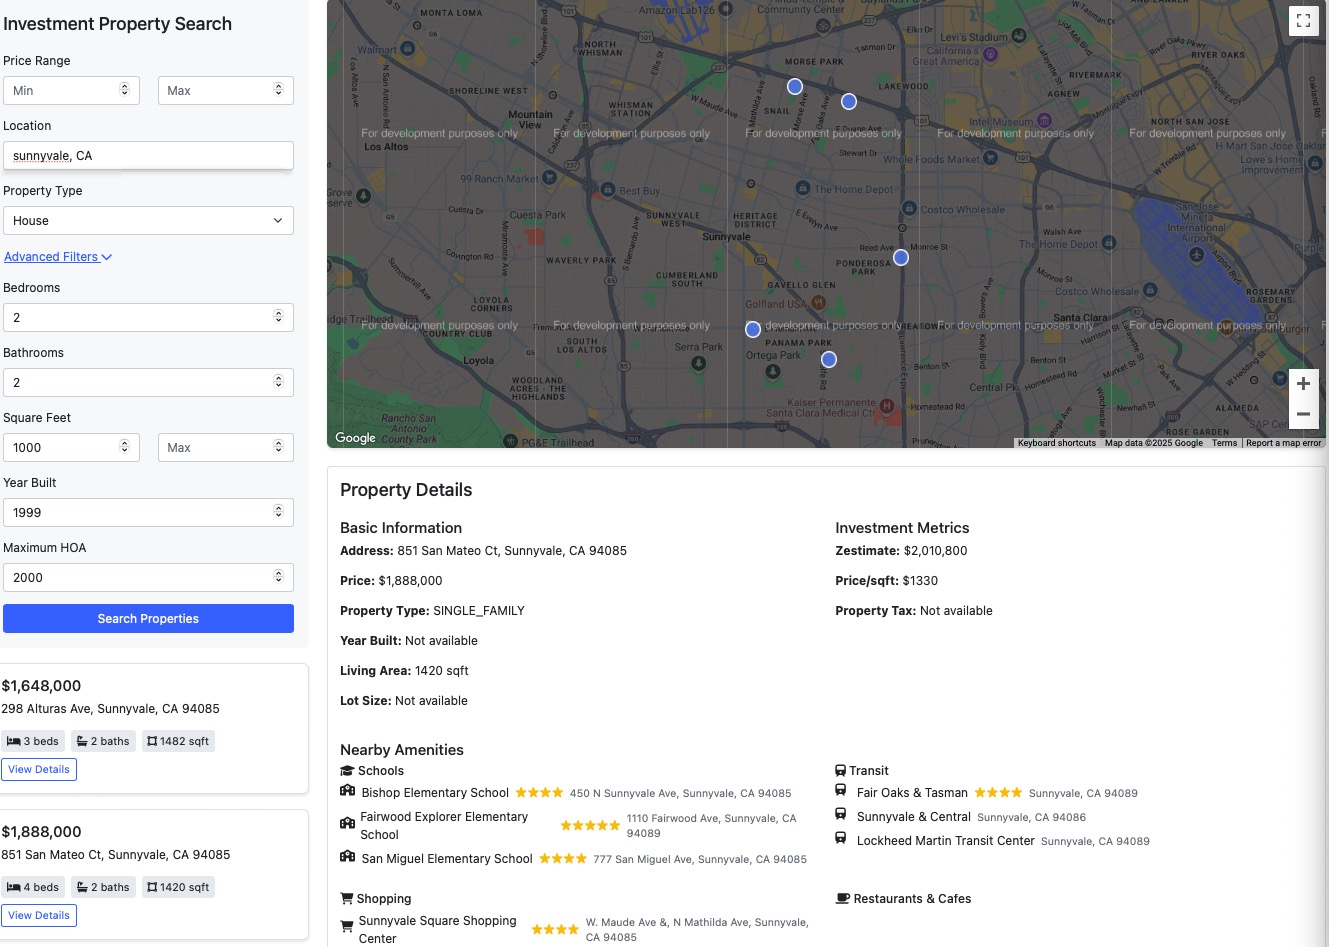
Real-time communication has become an integral part of modern web applications. Developing a chat application that can handle multiple users simultaneously requires robust technology and efficient coding practices. This guide provides a step-by-step approach to building a real-time chat application using Django, leveraging AI tools to streamline development.
Understanding the Project
The goal is to create a web-based chat room application using Django that allows multiple users to communicate in real time. The application will utilize WebSockets for real-time communication, and we'll integrate AI tools to assist in coding and development.
Prerequisites
- Basic knowledge of Python and Django framework.
- Understanding of WebSocket protocol.
- Familiarity with JavaScript and front-end development.
Setting Up the Development Environment
-
Install Python and Virtual Environment
Ensure Python is installed on your system. Create a virtual environment to isolate project dependencies.
python -m venv venv source venv/bin/activate # On Windows use `venv\Scripts\activate` -
Install Django and Channels
Django Channels are essential for handling WebSockets in Django.
pip install django
pip install channels
Project Structure
Create a new Django project and app:
django-admin startproject ChatRoom
cd ChatRoom
django-admin startapp chat
Configuring Django Settings
Edit ChatRoom/settings.py to include necessary configurations:
# Add 'channels' and 'chat' to INSTALLED_APPS
INSTALLED_APPS = [
    # ...
    'channels',
    'chat',
]

# Configure ASGI application
ASGI_APPLICATION = 'ChatRoom.asgi.application'

# Set up channel layers
CHANNEL_LAYERS = {
    'default': {
        'BACKEND': 'channels.layers.InMemoryChannelLayer',
    },
}
Developing the Chat Consumer
The consumer handles WebSocket connections and communication.Create chat/consumers.py:
import json
from channels.generic.websocket import AsyncWebsocketConsumer
from datetime import datetime
import uuid

class ChatConsumer(AsyncWebsocketConsumer):
    # Class variables to store clients and messages
    clients = set()
    message_cache = []
    cache_size = 200
    client_id = 1

    async def connect(self):
        await self.accept()
        self.client_id = ChatConsumer.client_id
        ChatConsumer.client_id += 1
        self.username = f"Guest{self.client_id}"
        ChatConsumer.clients.add(self)

        # Inform other users about new connection
        await self.broadcast_message({
            'type': 'online',
            'client_id': self.client_id,
            'username': self.username,
            'datetime': datetime.now().strftime("%Y-%m-%d %H:%M:%S")
        })

        # Send message history to the new user
        for message in ChatConsumer.message_cache:
            await self.send(text_data=json.dumps(message))

    async def disconnect(self, close_code):
        ChatConsumer.clients.remove(self)
        await self.broadcast_message({
            'type': 'offline',
            'client_id': self.client_id,
            'username': self.username,
            'datetime': datetime.now().strftime("%Y-%m-%d %H:%M:%S")
        })

    async def receive(self, text_data):
        data = json.loads(text_data)
        self.username = data.get('username', self.username)

        message = {
            'id': str(uuid.uuid4()),
            'type': 'message',
            'client_id': self.client_id,
            'username': self.username,
            'body': data.get('body', ''),
            'datetime': datetime.now().strftime("%Y-%m-%d %H:%M:%S")
        }

        ChatConsumer.update_cache(message)
        await self.broadcast_message(message)

    @classmethod
    def update_cache(cls, message):
        cls.message_cache.append(message)
        if len(cls.message_cache) > cls.cache_size:
            cls.message_cache = cls.message_cache[-cls.cache_size:]

    async def broadcast_message(self, message):
        for client in ChatConsumer.clients:
            await client.send(text_data=json.dumps(message))
Setting Up WebSocket Routing
Create chat/routing.py:
from django.urls import re_path
from . import consumers

websocket_urlpatterns = [
    re_path(r'ws/chat/$', consumers.ChatConsumer.as_asgi()),
]
Configure ChatRoom/asgi.py:
import os
from django.core.asgi import get_asgi_application
from channels.routing import ProtocolTypeRouter, URLRouter
from channels.auth import AuthMiddlewareStack
from chat.routing import websocket_urlpatterns

os.environ.setdefault('DJANGO_SETTINGS_MODULE', 'ChatRoom.settings')

application = ProtocolTypeRouter({
    "http": get_asgi_application(),
    "websocket": AuthMiddlewareStack(
        URLRouter(
            websocket_urlpatterns
        )
    ),
})
Creating Views and Templates
Edit chat/views.py:
from django.shortcuts import render
from .consumers import ChatConsumer

def index(request):
    context = {
        'messages': ChatConsumer.message_cache,
        'clients': ChatConsumer.clients,
        'username': f"Guest{ChatConsumer.client_id}"
    }
    return render(request, 'chat/index.html', context)
Create chat/templates/chat/index.html:
<!DOCTYPE html>
<html>
<head>
    <meta charset="UTF-8">
    <title>Django Chat Room</title>
    <link rel="stylesheet" href="/static/css/chat.css" type="text/css">
    <script src="/static/js/jquery.min.js"></script>
    <script src="/static/js/chat.js"></script>
</head>
<body>
    <div id="body">
        <div id="users">
            Online Users:<br/>
            <ul id="user_list">
                {% for client in clients %}
                <li id="{{ client.client_id }}">{{ client.username }}</li>
                {% endfor %}
            </ul>
        </div>
        <div id="right">
            <div id="inbox">
                {% for message in messages %}
                {% include "chat/message.html" %}
                {% endfor %}
            </div>
            <form id="messageform">
                <table>
                    <tr>
                        <td>Username:</td>
                        <td><input name="username" id="username" style="width:100px" value="{{ username }}"></td>
                    </tr>
                    <tr>
                        <td>Message:</td>
                        <td><input name="body" id="message" style="width:500px"></td>
                    </tr>
                    <tr>
                        <td colspan="2">
                            <input type="submit" value="Send">
                        </td>
                    </tr>
                </table>
            </form>
        </div>
    </div>
</body>
</html>
Create chat/templates/chat/message.html:
<div class="message" id="m{{ message.id }}">
    {{ message.username }} says: {{ message.body }} ({{ message.datetime }})
</div>
Developing the Frontend JavaScript
Create chat/static/js/chat.js:
$(document).ready(function() {
    $("#messageform").on("submit", function(e) {
        e.preventDefault();
        newMessage($(this));
    });

    $("#messageform").on("keypress", function(e) {
        if (e.keyCode == 13) {
            newMessage($(this));
            return false;
        }
    });

    $("#message").focus();
    updater.start();
});

function addUser(id, name) {
    var ul = $('#user_list');
    var li = $('<li>').attr('id', id).text(name);
    ul.append(li);
}

function removeUser(id) {
    $('#' + id).remove();
}

function newMessage(form) {
    var message = {
        username: $("#username").val(),
        body: $("#message").val()
    };
    updater.socket.send(JSON.stringify(message));
    $("#message").val("").focus();
}

var updater = {
    socket: null,

    start: function() {
        var ws_scheme = window.location.protocol == "https:" ? "wss" : "ws";
        this.socket = new WebSocket(ws_scheme + '://' + window.location.host + "/ws/chat/");
        this.socket.onmessage = function(event) {
            var message = JSON.parse(event.data);
            updater.showMessage(message);
        };
    },

    showMessage: function(message) {
        removeUser(message.client_id);
        if (message.type !== "offline") {
            addUser(message.client_id, message.username);
        }
        if (message.type === "message" && message.body) {
            var node = $('<div>').addClass('message').attr('id', 'm' + message.id)
                .text(message.username + ' says: ' + message.body + ' (' + message.datetime + ')');
            node.hide();
            $("#inbox").append(node);
            node.slideDown();
        }
    }
};
Adding Styles to Enhance Appearance
Create chat/static/css/chat.css:
/* Styles for user list and chat messages */
#users {
    float: left;
    width: 20%;
}

#right {
    float: right;
    width: 75%;
}

#inbox {
    height: 400px;
    overflow-y: scroll;
    border: 1px solid #ccc;
    padding: 5px;
}

.message {
    margin-bottom: 5px;
}
Integrating AI Tools
To streamline development and improve code quality, consider using AI-powered code assistants like GitHub Copilot or OpenAI's ChatGPT. These tools can help generate code snippets, suggest improvements, and even identify potential bugs.
Benefits of Using AI Tools
- Efficiency: Reduces development time by generating boilerplate code.
- Error Reduction: Helps in spotting syntax errors and logical issues.
- Learning Aid: Offers explanations and alternative solutions to coding problems.
Affiliate Resources for Learning and Hosting
-
Educative.io: An interactive learning platform for developers. Enhance your skills with hands-on courses tailored for all levels.
-
InterServer Hosting: Reliable hosting services for deploying your chat application. Check out their VPS options for scalable solutions.
Testing the Application
Run migrations and start the development server:
python manage.py migrate
python manage.py runserver
Open the browser and navigate to http://localhost:8000/. Enter a username and start chatting!
Key Takeaways
- Building a real-time chat application involves backend WebSocket handling and frontend dynamic updates.
- Django Channels simplifies the integration of WebSockets in Django projects.
- AI tools can significantly enhance development by providing code suggestions and automation.
- Proper project structuring and clear separation of concerns lead to maintainable and scalable applications.
References
- Django Documentation. (2023). WebSockets and Channels. Retrieved from https://docs.djangoproject.com/
- Educative.io. (2023). Interactive Courses for Developers. Retrieved from https://www.educative.io/
- InterServer. (2023). VPS Hosting Solutions. Retrieved from https://www.interserver.net/
![[100-Day AI bootcamp] Day 8: Financial Data Assistant](https://growgrow.s3.us-east-2.amazonaws.com/media/blog_images/5321738902254_.pic.jpg)
![[100-Day AI bootcamp] Day 32: Flashcard Generator](https://growgrow.s3.us-east-2.amazonaws.com/media/blog_images/4421737105713_.pic.jpg)
![[100-Day AI bootcamp] Day 9: AI Resume Builder](https://growgrow.s3.us-east-2.amazonaws.com/media/blog_images/4231736341062_.pic.jpg)
![[100-Day AI bootcamp] Day 8: AI generated Children book web app](https://growgrow.s3.us-east-2.amazonaws.com/media/blog_images/4221736329152_.pic.jpg)
![[100-Day AI bootcamp] Day 7: Short Text social media App](https://growgrow.s3.us-east-2.amazonaws.com/media/blog_images/4211736248200_.pic.jpg)
![[100-Day AI bootcamp] Day 1: AI-Powered Blog](https://growgrow.s3.us-east-2.amazonaws.com/media/blog_images/4161736157861_.pic.jpg)
![[100-Day AI bootcamp] Day 22: Movie Recommendation and Sentiment Analysis Web App](https://growgrow.s3.us-east-2.amazonaws.com/media/blog_images/4151736154176_.pic.jpg)
![[100-Day AI bootcamp] Day 12: Personal Diary App](https://growgrow.s3.us-east-2.amazonaws.com/media/blog_images/4571735986511_.pic.jpg)

Comments
Please log in to leave a comment.
No comments yet.