[100-Day AI bootcamp] Day 32: Flashcard Generator
![[100-Day AI bootcamp] Day 32: Flashcard Generator](https://growgrow.s3.us-east-2.amazonaws.com/media/blog_images/4421737105713_.pic.jpg)
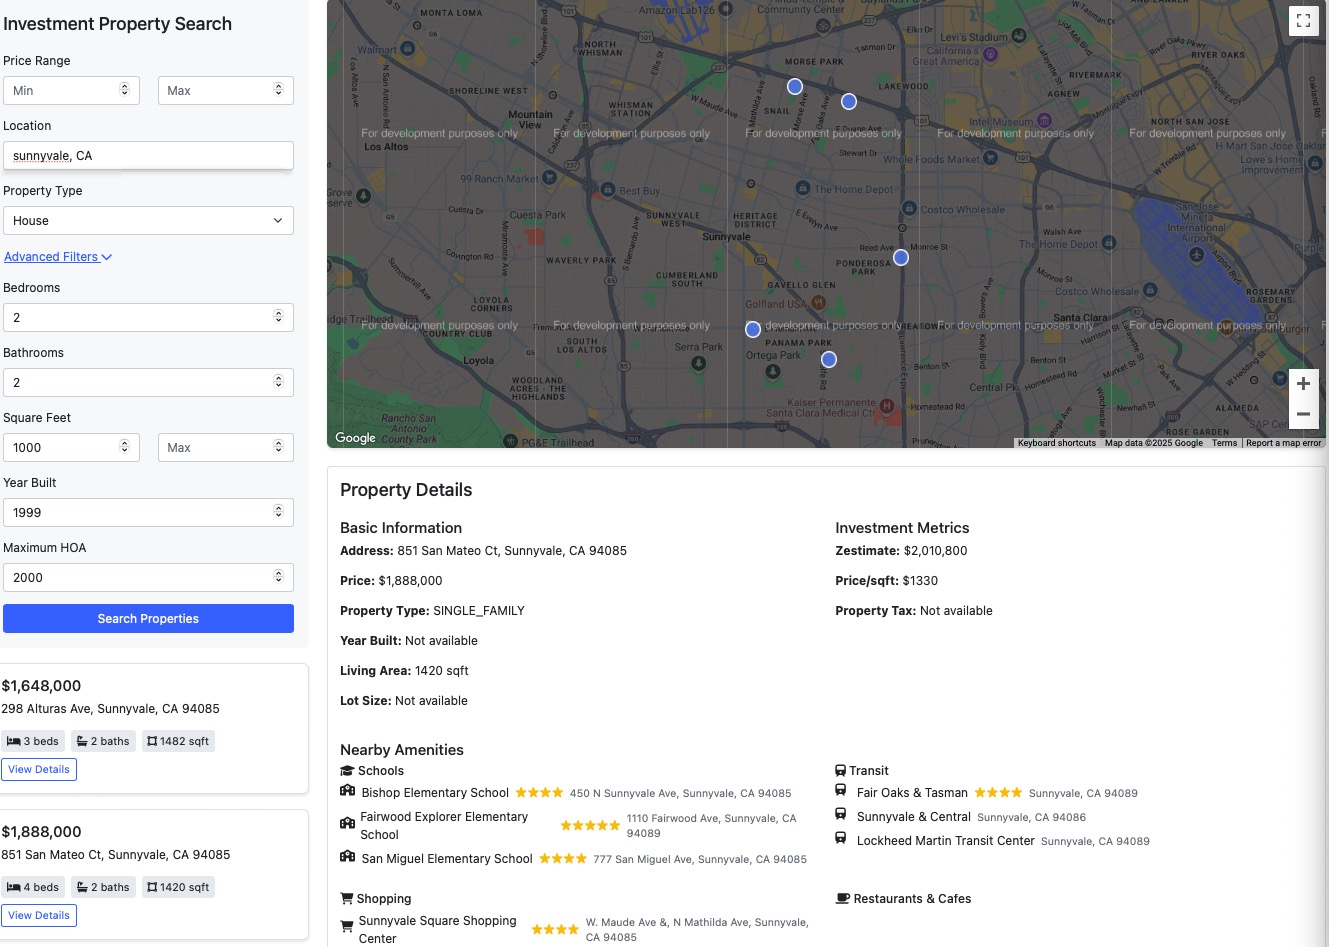
Creating educational tools that enhance learning experiences has become increasingly important. An AI-powered flashcard generator can transform the way students interact with study materials. This guide will walk you through building a full-stack application using Django and OpenAI's GPT-3.5-turbo model to generate interactive quizzes and flashcards from PDF documents.
Overview of the Project
The application we're building allows users to upload PDF documents, which are then processed to generate multiple-choice quizzes and flashcards. Key features include:
- PDF Upload and Text Extraction: Users can upload PDFs, and the system extracts the text content.
- AI-Powered Content Generation: Utilizes OpenAI's GPT-3.5-turbo to create questions and flashcards.
- Interactive Quizzes: Automatically generated quizzes based on the uploaded content.
- Progress Tracking: Users can track their quiz results and identify areas for improvement.
- User Authentication: Secure login system with profile management.
- Asynchronous Task Handling: Uses Celery and Redis to manage long-running tasks.
Tech Stack Components
Backend
- Django: Serves as the backbone of the application, handling URL routing, request handling, and database interactions.
- Django REST Framework: Facilitates the creation of RESTful APIs.
- PostgreSQL: Relational database for storing user data, documents, quizzes, and more.
- Celery: Manages asynchronous tasks, such as processing PDFs and generating flashcards without blocking the main application.
- Redis: Acts as a message broker for Celery tasks.
- OpenAI API: Integrates GPT-3.5-turbo for AI processing.
Frontend
- Django Templates: Utilizes server-side rendering for HTML templates.
- Bootstrap 5: Provides responsive design elements and UI components.
- JavaScript: Enhances interactivity on the client side.
Optional iOS App (Integration Example)
- Swift and SwiftUI/UIKit: For developing a native iOS application.
- Alamofire: Networking library to handle API requests on iOS.
Step-by-Step Implementation
1. Setting Up the Django Project
Install Dependencies
pip install django djangorestframework psycopg2-binary celery redis openai
Create Django Project and App
django-admin startproject flashcard_project
cd flashcard_project
python manage.py startapp core
Configure
settings.py
# flashcard_project/settings.py

INSTALLED_APPS = [
    # ...
    'rest_framework',
    'core',
]

DATABASES = {
    'default': {
        'ENGINE': 'django.db.backends.postgresql',
        'NAME': 'flashcard_db',
        'USER': 'your_username',
        'PASSWORD': 'your_password',
        'HOST': 'localhost',
        'PORT': '5432',
    }
}

# Celery Configuration
CELERY_BROKER_URL = 'redis://localhost:6379/0'
Set Up URLs
# flashcard_project/urls.py

from django.urls import path, include

urlpatterns = [
    path('', include('core.urls')),
]
2. Designing the Models
Models for Document, Flashcard, and User Progress
# core/models.py

from django.db import models
from django.contrib.auth.models import User

class Document(models.Model):
    uploaded_by = models.ForeignKey(User, on_delete=models.CASCADE)
    uploaded_file = models.FileField(upload_to='documents/')
    uploaded_at = models.DateTimeField(auto_now_add=True)
    processed = models.BooleanField(default=False)

class Flashcard(models.Model):
    document = models.ForeignKey(Document, on_delete=models.CASCADE)
    question = models.TextField()
    correct_answer = models.TextField()
    incorrect_options = models.JSONField()
Apply Migrations
python manage.py makemigrations
python manage.py migrate
3. Handling File Uploads and Text Extraction
Creating the Upload Form
# core/forms.py

from django import forms

class DocumentForm(forms.ModelForm):
    class Meta:
        model = Document
        fields = ['uploaded_file']
Writing the View for File Uploads
# core/views.py

from django.shortcuts import render, redirect
from .forms import DocumentForm
from .models import Document
from .tasks import process_pdf_and_generate_flashcards

def upload_document(request):
    if request.method == 'POST':
        form = DocumentForm(request.POST, request.FILES)
        if form.is_valid():
            document = form.save(commit=False)
            document.uploaded_by = request.user
            document.save()
            # Start asynchronous task
            process_pdf_and_generate_flashcards.delay(document.id)
            return redirect('dashboard')
    else:
        form = DocumentForm()
    return render(request, 'upload.html', {'form': form})
Extracting Text from PDFs
# core/utils.py

import PyPDF2

def extract_text_from_pdf(pdf_path):
    text = ''
    with open(pdf_path, 'rb') as f:
        reader = PyPDF2.PdfReader(f)
        for page in reader.pages:
            text += page.extract_text()
    return text
4. Integrating OpenAI for AI-Powered Generation
Generating Flashcards with OpenAI
# core/ai.py

import openai
import json
from django.conf import settings

openai.api_key = settings.OPENAI_API_KEY

def generate_flashcards(text):
    # Truncate text to a maximum length
    max_text_length = 4000
    truncated_text = text[:max_text_length]

    # Construct the prompt for the AI model
    prompt = (
        "Create multiple-choice questions from the following text. "
        "Format: Return a JSON array where each object has these fields:\n"
        "- 'question': the question text\n"
        "- 'correct_answer': the correct answer\n"
        "- 'incorrect_options': array of three plausible but incorrect options\n"
        "Make questions test understanding and application, not just memorization."
        f"\n\nText: {truncated_text}"
    )

    # Send the request to OpenAI's API
    response = openai.ChatCompletion.create(
        model="gpt-3.5-turbo",
        messages=[
            {"role": "system", "content": (
                "You are a helpful assistant that creates educational multiple-choice questions."
            )},
            {"role": "user", "content": prompt}
        ],
        max_tokens=2000,
        temperature=0.7,
    )

    # Parse the response and return the questions
    content = response.choices[0].message.content.strip()
    try:
        questions = json.loads(content)
        return questions
    except json.JSONDecodeError:
        return []
Asynchronous Task Processing with Celery
# core/tasks.py

from celery import shared_task
from .models import Document, Flashcard
from .utils import extract_text_from_pdf
from .ai import generate_flashcards

@shared_task
def process_pdf_and_generate_flashcards(document_id):
    document = Document.objects.get(id=document_id)
    text = extract_text_from_pdf(document.uploaded_file.path)
    questions = generate_flashcards(text)

    for q in questions:
        Flashcard.objects.create(
            document=document,
            question=q['question'],
            correct_answer=q['correct_answer'],
            incorrect_options=q['incorrect_options']
        )
    document.processed = True
    document.save()
5. Setting Up Celery and Redis
Starting Redis Server
Make sure you have Redis installed and start the server:
redis-server
Configuring Celery
Create a
celery.py
file in your project root:
# flashcard_project/celery.py

import os
from celery import Celery

os.environ.setdefault('DJANGO_SETTINGS_MODULE', 'flashcard_project.settings')
app = Celery('flashcard_project')
app.config_from_object('django.conf:settings', namespace='CELERY')
app.autodiscover_tasks()
Update
__init__.py
# flashcard_project/__init__.py

from .celery import app as celery_app

__all__ = ('celery_app',)
Running Celery Worker
In a new terminal window, start the Celery worker:
celery -A flashcard_project worker -l info
6. Building the Frontend with Django Templates
Creating Templates
-
Upload Page (upload.html)
<!-- templates/upload.html --> <h1>Upload a PDF Document</h1> <form method="post" enctype="multipart/form-data"> {% csrf_token %} {{ form.as_p }} <button type="submit">Upload</button> </form> -
Dashboard Page (dashboard.html)
<!-- templates/dashboard.html -->

<h1>Your Documents</h1>
<ul>
    {% for doc in documents %}
        <li>
            {{ doc.uploaded_file.name }} -
            {% if doc.processed %}
                <a href="{% url 'flashcards' doc.id %}">View Flashcards</a>
            {% else %}
                Processing...
            {% endif %}
        </li>
    {% endfor %}
</ul>
Handling User Views
# core/views.py

from django.shortcuts import render
from .models import Document, Flashcard

def dashboard(request):
    documents = Document.objects.filter(uploaded_by=request.user)
    return render(request, 'dashboard.html', {'documents': documents})

def flashcards_view(request, document_id):
    flashcards = Flashcard.objects.filter(document_id=document_id)
    return render(request, 'flashcards.html', {'flashcards': flashcards})
Updating URLs
# core/urls.py

from django.urls import path
from . import views

urlpatterns = [
    path('upload/', views.upload_document, name='upload'),
    path('dashboard/', views.dashboard, name='dashboard'),
    path('flashcards/<int:document_id>/', views.flashcards_view, name='flashcards'),
]
7. Implementing User Authentication
Using Django's Built-in Authentication
-
Add'django.contrib.auth', 'django.contrib.contenttypes', 'django.contrib.sessions', 'django.contrib.messages' to INSTALLED_APPS in settings.py
-
Include authentication URLs:
# flashcard_project/urls.py from django.contrib import admin from django.urls import path, include urlpatterns = [ path('admin/', admin.site.urls), path('accounts/', include('django.contrib.auth.urls')), path('', include('core.urls')), ] -
Use Django's templates for login and logout or customize as needed.
8. Integrating Payment and API Usage Tracking (Optional)
Subscription Management
For handling payments and API usage tracking, you can integrate platforms like Stripe or PayPal. Here's a simplified example using Stripe:
Install Stripe
pip install stripe
Configure Stripe
# flashcard_project/settings.py

STRIPE_SECRET_KEY = 'your_stripe_secret_key'
STRIPE_PUBLISHABLE_KEY = 'your_stripe_publishable_key'
Create Payment Views
# core/views.py

import stripe
from django.conf import settings

stripe.api_key = settings.STRIPE_SECRET_KEY

def checkout(request):
    # Implement checkout logic
    pass
Note: Implementing a full payment system involves handling webhooks, securely processing payments, and ensuring compliance with financial regulations.
Key Takeaways
- Asynchronous Processing: By using Celery and Redis, the application can handle time-consuming tasks without affecting user experience.
- AI Integration: Leveraging OpenAI's GPT-3.5-turbo allows for dynamic generation of educational content.
- Scalable Architecture: The use of Django REST Framework and PostgreSQL sets a solid foundation for scaling the application.
- User-Centric Design: Features like progress tracking and error analysis enhance the learning experience.
Additional Resources
-
Educative.io: For interactive courses on Django, AI integration, and web development, consider exploring Educative.io. Their hands-on platform helps developers acquire in-demand skills.
-
Recommended Reading:
- Django for Beginners by William S. Vincent. Buy on Amazon
- Building Machine Learning Powered Applicationsby Emmanuel Ameisen. Buy on Amazon
Affiliate Disclaimer: This post may contain affiliate links. If you use these links to buy something, we may earn a commission.
Conclusion
Building an AI-powered flashcard generator involves integrating various technologies to create a seamless user experience. By following this guide, developers can learn how to harness the capabilities of Django and OpenAI to create educational tools that adapt to users' needs.
References
-
OpenAI. (2023). GPT-3.5-turbo Documentation. Retrieved from OpenAI API
-
Django Software Foundation. (2023). Django Documentation. Retrieved from Django Docs
-
Celery Project. (2023). Celery Documentation. Retrieved from Celery Docs
-
Redis Labs. (2023). Redis Documentation. Retrieved from Redis Docs
![[100-Day AI bootcamp] Day 8: Financial Data Assistant](https://growgrow.s3.us-east-2.amazonaws.com/media/blog_images/5321738902254_.pic.jpg)
![[100-Day AI bootcamp] Day 9: AI Resume Builder](https://growgrow.s3.us-east-2.amazonaws.com/media/blog_images/4231736341062_.pic.jpg)
![[100-Day AI bootcamp] Day 8: AI generated Children book web app](https://growgrow.s3.us-east-2.amazonaws.com/media/blog_images/4221736329152_.pic.jpg)
![[100-Day AI bootcamp] Day 7: Short Text social media App](https://growgrow.s3.us-east-2.amazonaws.com/media/blog_images/4211736248200_.pic.jpg)
![[100-Day AI bootcamp] Day 2: Building a Real-Time Chatroom with Django](https://growgrow.s3.us-east-2.amazonaws.com/media/blog_images/4201736241999_.pic.jpg)
![[100-Day AI bootcamp] Day 1: AI-Powered Blog](https://growgrow.s3.us-east-2.amazonaws.com/media/blog_images/4161736157861_.pic.jpg)
![[100-Day AI bootcamp] Day 22: Movie Recommendation and Sentiment Analysis Web App](https://growgrow.s3.us-east-2.amazonaws.com/media/blog_images/4151736154176_.pic.jpg)
![[100-Day AI bootcamp] Day 12: Personal Diary App](https://growgrow.s3.us-east-2.amazonaws.com/media/blog_images/4571735986511_.pic.jpg)

Comments
Please log in to leave a comment.
No comments yet.