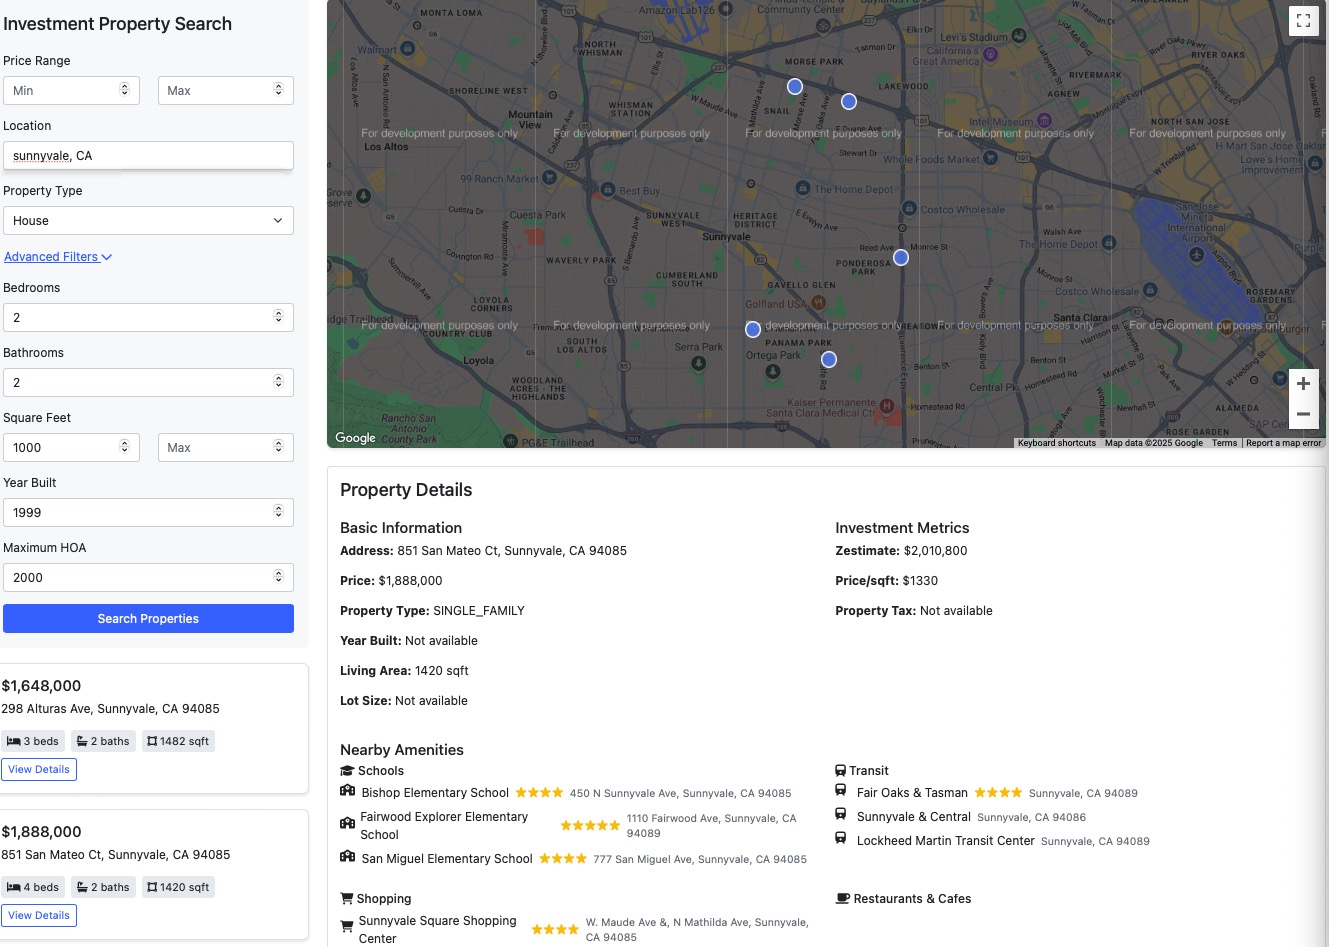
[100-Day AI bootcamp] Day 12: Personal Diary App
![[100-Day AI bootcamp] Day 12: Personal Diary App](https://growgrow.s3.us-east-2.amazonaws.com/media/blog_images/4571735986511_.pic.jpg)
Maintaining a personal diary can be a powerful tool for self-reflection and emotional well-being in today's fast-paced world. Imagine an app that allows you to journal your daily experiences, analyze your mood, provide thoughtful prompts, and visually represent your emotional trends over time. This guide will walk you through creating such an intelligent iOS diary app, integrating user authentication, sentiment analysis, structured and free-form entries, a color-coded calendar, and consolidated insights. Additionally, we'll explore how to incorporate affiliate marketing to enhance the app's functionality and revenue potential.
Crafting a Secure and Personalized Experience with User Authentication
Ensuring that each user’s data remains private and secure is paramount. A robust login/logout system protects user information and provides a personalized experience. We’ll utilize Firebase Authentication, a reliable and easy-to-implement solution for managing user authentication.
Setting Up Firebase Authentication
Begin by creating a Firebase project:
- Create a Firebase Project: Visit the Firebase Console and create a new project following the on-screen instructions.
- Add Your iOS App: In your Firebase project dashboard, select "Add App" and choose iOS. Register your app by providing the necessary details, download the GoogleService-Info.plist file, and add it to your Xcode project.
- Install Firebase SDK: Use Swift Package Manager to add Firebase to your project. In Xcode, navigate to File > Add Packages and enter https://github.com/firebase/firebase-ios-sdk. Select FirebaseAuth and complete the installation.
Configuring Firebase in Your App
Import Firebase and configure it within your SwiftUI app structure:
import SwiftUI
import Firebase

@main
struct DiaryApp: App {
    @UIApplicationDelegateAdaptor(AppDelegate.self) var appDelegate

    var body: some Scene {
        WindowGroup {
            ContentView()
        }
    }
}

class AppDelegate: NSObject, UIApplicationDelegate {
    func application(_ application: UIApplication,
                     didFinishLaunchingWithOptions launchOptions: [UIApplication.LaunchOptionsKey: Any]? = nil) -> Bool {
        FirebaseApp.configure()
        return true
    }
}
Designing the Authentication Interface
Create views for Login, Register, and the Main Content. Here's a streamlined example:
import SwiftUI
import FirebaseAuth

struct ContentView: View {
    @State private var isAuthenticated = false

    var body: some View {
        if isAuthenticated {
            MainDiaryView()
        } else {
            AuthenticationView(isAuthenticated: $isAuthenticated)
        }
    }
}

struct AuthenticationView: View {
    @Binding var isAuthenticated: Bool
    @State private var email = ""
    @State private var password = ""
    @State private var showRegister = false
    @State private var errorMessage = ""

    var body: some View {
        VStack(spacing: 20) {
            Text("Welcome to My Diary")
                .font(.largeTitle)
                .padding()

            TextField("Email", text: $email)
                .padding()
                .background(Color(.secondarySystemBackground))
                .cornerRadius(8)

            SecureField("Password", text: $password)
                .padding()
                .background(Color(.secondarySystemBackground))
                .cornerRadius(8)

            if !errorMessage.isEmpty {
                Text(errorMessage)
                    .foregroundColor(.red)
            }

            Button(action: login) {
                Text("Login")
                    .foregroundColor(.white)
                    .padding()
                    .frame(maxWidth: .infinity)
                    .background(Color.blue)
                    .cornerRadius(8)
            }

            Button(action: { showRegister.toggle() }) {
                Text("Don't have an account? Register")
            }
            .sheet(isPresented: $showRegister) {
                RegisterView(isAuthenticated: $isAuthenticated)
            }
        }
        .padding()
    }

    func login() {
        Auth.auth().signIn(withEmail: email, password: password) { result, error in
            if let error = error {
                errorMessage = error.localizedDescription
            } else {
                isAuthenticated = true
            }
        }
    }
}

struct RegisterView: View {
    @Binding var isAuthenticated: Bool
    @State private var email = ""
    @State private var password = ""
    @State private var confirmPassword = ""
    @State private var errorMessage = ""

    var body: some View {
        VStack(spacing: 20) {
            Text("Create Account")
                .font(.title)
                .padding()

            TextField("Email", text: $email)
                .padding()
                .background(Color(.secondarySystemBackground))
                .cornerRadius(8)

            SecureField("Password", text: $password)
                .padding()
                .background(Color(.secondarySystemBackground))
                .cornerRadius(8)

            SecureField("Confirm Password", text: $confirmPassword)
                .padding()
                .background(Color(.secondarySystemBackground))
                .cornerRadius(8)

            if !errorMessage.isEmpty {
                Text(errorMessage)
                    .foregroundColor(.red)
            }

            Button(action: register) {
                Text("Register")
                    .foregroundColor(.white)
                    .padding()
                    .frame(maxWidth: .infinity)
                    .background(Color.green)
                    .cornerRadius(8)
            }
        }
        .padding()
    }

    func register() {
        guard password == confirmPassword else {
            errorMessage = "Passwords do not match."
            return
        }

        Auth.auth().createUser(withEmail: email, password: password) { result, error in
            if let error = error {
                errorMessage = error.localizedDescription
            } else {
                isAuthenticated = true
            }
        }
    }
}
This setup ensures users can securely create accounts, log in, and access their personalized diary entries.
Facilitating Rich Journal Entries: Combining Structured and Free Writing
A versatile diary app should cater to different journaling styles. Users can capture their thoughts comprehensively by allowing free-form text and structured responses to specific prompts.
Designing the Diary Entry Model
Expand the data model to support both free text and answers to predefined questions:
import Foundation

struct DiaryEntry: Identifiable {
    let id: UUID
    let date: Date
    var freeText: String
    var structuredResponses: [StructuredQuestion: String]
    let sentimentScore: Double
}

enum StructuredQuestion: String, CaseIterable {
    case music = "What music did you listen to today?"
    case book = "Which book/article did you read with the most insights?"
    case video = "Which video (YouTube, TV, movie, etc.) did you watch today that was impressive?"
    case selfCare = "What did you do today to take care of yourself?"
    case pride = "What made you feel proud of yourself today?"
}
Creating the Diary Entry Interface
Develop an interface that integrates both free writing and structured prompts:
import SwiftUI
import FirebaseAuth

struct MainDiaryView: View {
    @Environment(\.managedObjectContext) private var viewContext
    @FetchRequest(
        sortDescriptors: [NSSortDescriptor(keyPath: \DiaryEntryEntity.date, ascending: false)],
        animation: .default)
    private var diaryEntriesEntities: FetchedResults<DiaryEntryEntity>

    @State private var freeText = ""
    @State private var structuredResponses: [StructuredQuestion: String] = [:]
    @State private var reflectionPrompt = ""
    @State private var showLogoutAlert = false

    var diaryEntries: [DiaryEntry] {
        diaryEntriesEntities.map { entry in
            DiaryEntry(
                id: entry.id ?? UUID(),
                date: entry.date ?? Date(),
                freeText: entry.freeText ?? "",
                structuredResponses: Dictionary(uniqueKeysWithValues: (entry.structuredQuestions ?? []).compactMap {
                    guard let key = StructuredQuestion(rawValue: $0.question ?? "") else { return nil }
                    return (key, $0.response ?? "")
                }),
                sentimentScore: entry.sentimentScore)
        }
    }

    var body: some View {
        TabView {
            VStack {
                CalendarView(diaryEntries: diaryEntries)
                    .padding()

                ScrollView {
                    VStack(alignment: .leading, spacing: 15) {
                        Text("Free Writing")
                            .font(.headline)

                        TextEditor(text: $freeText)
                            .padding()
                            .frame(height: 150)
                            .background(Color(.secondarySystemBackground))
                            .cornerRadius(8)

                        ForEach(StructuredQuestion.allCases, id: \.self) { question in
                            VStack(alignment: .leading) {
                                Text(question.rawValue)
                                    .font(.subheadline)
                                    .foregroundColor(.gray)
                                TextField("Your answer...", text: Binding(
                                    get: { structuredResponses[question] ?? "" },
                                    set: { structuredResponses[question] = $0 }
                                ))
                                .padding()
                                .background(Color(.secondarySystemBackground))
                                .cornerRadius(8)
                            }
                        }

                        Button(action: saveEntry) {
                            Text("Save Entry")
                                .foregroundColor(.white)
                                .padding()
                                .frame(maxWidth: .infinity)
                                .background(Color.blue)
                                .cornerRadius(8)
                        }
                        .padding(.top, 10)

                        if !reflectionPrompt.isEmpty {
                            Text(reflectionPrompt)
                                .font(.headline)
                                .padding()
                        }
                    }
                    .padding()
                }
            }
            .tabItem {
                Label("Diary", systemImage: "book")
            }

            ConsolidatedInsightsView(diaryEntries: diaryEntries)
                .tabItem {
                    Label("Insights", systemImage: "chart.bar")
                }
        }
        .navigationBarItems(trailing: Button("Logout") {
            showLogoutAlert = true
        })
        .alert(isPresented: $showLogoutAlert) {
            Alert(title: Text("Logout"),
                  message: Text("Are you sure you want to logout?"),
                  primaryButton: .destructive(Text("Logout")) {
                    logout()
                  },
                  secondaryButton: .cancel())
        }
    }

    func saveEntry() {
        let sentiment = analyzeSentimentScore(for: freeText)
        reflectionPrompt = getReflectionPrompt(for: sentiment)

        let newEntry = DiaryEntryEntity(context: viewContext)
        newEntry.id = UUID()
        newEntry.date = Date()
        newEntry.freeText = freeText
        newEntry.sentimentScore = sentiment

        // Save structured responses
        for (question, response) in structuredResponses {
            let structured = StructuredResponseEntity(context: viewContext)
            structured.question = question.rawValue
            structured.response = response
            newEntry.addToStructuredQuestions(structured)
        }

        do {
            try viewContext.save()
            freeText = ""
            structuredResponses = [:]
        } catch {
            print("Failed to save entry: \(error.localizedDescription)")
        }
    }

    func logout() {
        do {
            try Auth.auth().signOut()
        } catch {
            print("Error signing out: \(error.localizedDescription)")
        }
    }
}
This interface ensures that users can freely express their thoughts while answering specific prompts to enrich their journal entries.
Enhancing Emotional Insight with AI-Driven Sentiment Analysis
Understanding one's emotional patterns is crucial for personal growth. The app can classify moods based on diary entries by integrating sentiment analysis, providing users with valuable insights.
Implementing Sentiment Analysis with Swift
Use Apple's Natural Language (NL) framework to analyze the sentiment of user entries:
import NaturalLanguage

func analyzeSentimentScore(for text: String) -> Double {
    let sentimentPredictor = try? NLModel(mlModel: SentimentClassifier().model)
    guard let score = sentimentPredictor?.predictedLabelProbability(for: text)?["Positive"] else {
        return 0.0 // Neutral if unable to determine
    }

    // Convert probability to a score between -1.0 and +1.0
    let sentimentScore = (score * 2) - 1
    return sentimentScore
}
Note: Ensure you have a pre-trained sentiment analysis model named
SentimentClassifier.mlmodel
included in your Xcode project. This model should differentiate between positive and negative sentiments effectively.
Mapping Sentiment Scores to Moods
Translate numerical sentiment scores into descriptive moods:
extension Double {
    var moodColor: Color {
        switch self {
        case _ where self > 0.6:
            return Color.green // Very Positive
        case _ where self > 0.2:
            return Color.yellow // Positive
        case _ where self > -0.2:
            return Color.gray // Neutral
        case _ where self > -0.6:
            return Color.orange // Negative
        default:
            return Color.red // Very Negative
        }
    }

    var moodAccessibilityLabel: String {
        switch self {
        case _ where self > 0.6:
            return "Very Positive"
        case _ where self > 0.2:
            return "Positive"
        case _ where self > -0.2:
            return "Neutral"
        case _ where self > -0.6:
            return "Negative"
        default:
            return "Very Negative"
        }
    }
}
This extension defines how different sentiment scores correlate with colors and accessibility labels, enhancing both visual appeal and usability.
Visualizing Emotional Trends with a Color-Coded Calendar
A calendar view that reflects daily moods provides users with a clear visualization of their emotional trends over time. The app offers a nuanced picture of the user's emotional landscape by averaging multiple entries per day.
Structuring the Data Model
Adapt the data model to handle multiple entries per day and calculate average sentiment scores:
import Foundation

struct DayMood: Identifiable {
    let id = UUID()
    let date: Date
    let averageSentiment: Double

    var moodColor: Color {
        switch averageSentiment {
        case _ where averageSentiment > 0.6:
            return Color.green // Very Positive
        case _ where averageSentiment > 0.2:
            return Color.yellow // Positive
        case _ where averageSentiment > -0.2:
            return Color.gray // Neutral
        case _ where averageSentiment > -0.6:
            return Color.orange // Negative
        default:
            return Color.red // Very Negative
        }
    }

    var moodDescription: String {
        switch averageSentiment {
        case _ where averageSentiment > 0.6:
            return "Very Positive 😊"
        case _ where averageSentiment > 0.2:
            return "Positive 🙂"
        case _ where averageSentiment > -0.2:
            return "Neutral 😐"
        case _ where averageSentiment > -0.6:
            return "Negative 🙁"
        default:
            return "Very Negative 😞"
        }
    }
}
Generating Day Moods
Aggregate multiple entries per day to compute average sentiment:
func generateDayMoods(from diaryEntries: [DiaryEntry]) -> [DayMood] {
    let calendar = Calendar.current
    let groupedEntries = Dictionary(grouping: diaryEntries, by: { calendar.startOfDay(for: $0.date) })

    var dayMoods: [DayMood] = []

    for (date, entries) in groupedEntries {
        let totalScore = entries.reduce(0.0) { $0 + $1.sentimentScore }
        let average = totalScore / Double(entries.count)
        let dayMood = DayMood(date: date, averageSentiment: average)
        dayMoods.append(dayMood)
    }

    return dayMoods.sorted(by: { $0.date < $1.date })
}
This function organizes diary entries by date and calculates the average sentiment, resulting in a more accurate daily mood representation.
Designing the Calendar View
Use SwiftUI's LazyVGrid to create a responsive and interactive calendar:
import SwiftUI

struct CalendarView: View {
    let diaryEntries: [DiaryEntry]
    @State private var currentDate = Date()

    var dayMoods: [DayMood] {
        generateDayMoods(from: diaryEntries)
    }

    let dayLabels = ["Sun", "Mon", "Tue", "Wed", "Thu", "Fri", "Sat"]

    var body: some View {
        VStack {
            // Month Navigation
            HStack {
                Button(action: previousMonth) {
                    Image(systemName: "chevron.left")
                }
                Spacer()
                Text(currentMonthAndYear)
                    .font(.headline)
                Spacer()
                Button(action: nextMonth) {
                    Image(systemName: "chevron.right")
                }
            }
            .padding()

            // Day Labels
            HStack {
                ForEach(dayLabels, id: \.self) { day in
                    Text(day)
                        .font(.subheadline)
                        .foregroundColor(.blue)
                        .frame(maxWidth: .infinity)
                }
            }
            .padding(.bottom, 5)

            // Days Grid
            let daysInMonth = generateDaysInMonth(for: currentDate)
            let columns = Array(repeating: GridItem(.flexible()), count: 7)

            LazyVGrid(columns: columns, spacing: 10) {
                ForEach(daysInMonth, id: \.self) { date in
                    DayView(date: date, dayMoods: dayMoods)
                }
            }
        }
    }

    var currentMonthAndYear: String {
        let formatter = DateFormatter()
        formatter.dateFormat = "LLLL yyyy"
        return formatter.string(from: currentDate)
    }

    func generateDaysInMonth(for date: Date) -> [Date] {
        let calendar = Calendar.current
        guard let range = calendar.range(of: .day, in: .month, for: date) else { return [] }

        var days: [Date] = []
        for day in range {
            if let singleDate = calendar.date(bySetting: .day, value: day, of: date) {
                days.append(singleDate)
            }
        }
        return days
    }

    func previousMonth() {
        if let newDate = Calendar.current.date(byAdding: .month, value: -1, to: currentDate) {
            currentDate = newDate
        }
    }

    func nextMonth() {
        if let newDate = Calendar.current.date(byAdding: .month, value: 1, to: currentDate) {
            currentDate = newDate
        }
    }
}
Creating the Day View
Each day is represented with a color-coded circle reflecting the average sentiment:
struct DayView: View {
    let date: Date
    let dayMoods: [DayMood]
    @State private var showEntries = false

    var body: some View {
        let dayMood = dayMoods.first(where: { Calendar.current.isDate($0.date, inSameDayAs: date) })
        let color = dayMood?.moodColor ?? Color.clear
        let dayNumber = Calendar.current.component(.day, from: date)

        Button(action: {
            if dayMood != nil {
                showEntries = true
            }
        }) {
            Text("\(dayNumber)")
                .font(.subheadline)
                .frame(width: 30, height: 30)
                .background(dayMood != nil ? color : Color.clear)
                .clipShape(Circle())
                .foregroundColor(dayMood != nil ? .white : .primary)
        }
        .sheet(isPresented: $showEntries) {
            DiaryEntriesView(for: date)
        }
        .accessibilityLabel("\(dayNumber), \(dayMood?.moodDescription ?? "No entries")")
    }
}
Integrating the Calendar into the Main View
Ensure the main diary view incorporates the calendar and handles data effectively:
struct ContentView: View {
    @Environment(\.managedObjectContext) private var viewContext

    @FetchRequest(
        sortDescriptors: [NSSortDescriptor(keyPath: \DiaryEntryEntity.date, ascending: true)],
        animation: .default)
    private var diaryEntriesEntities: FetchedResults<DiaryEntryEntity>

    @State private var journalEntry: String = ""
    @State private var reflectionPrompt: String = ""

    var diaryEntries: [DiaryEntry] {
        diaryEntriesEntities.map { entry in
            DiaryEntry(date: entry.date ?? Date(),
                       text: entry.text ?? "",
                       structuredResponses: Dictionary(uniqueKeysWithValues: (entry.structuredQuestions ?? []).compactMap {
                           guard let key = StructuredQuestion(rawValue: $0.question ?? "") else { return nil }
                           return (key, $0.response ?? "")
                       }),
                       sentimentScore: entry.sentimentScore)
        }
    }

    var body: some View {
        NavigationView {
            VStack {
                CalendarView(diaryEntries: diaryEntries)
                    .padding()

                LegendView()
                    .padding()

                // Rest of the ContentView...
            }
            .navigationTitle("My Diary")
        }
    }
}
Allowing Flexibility with Editable Diary Entries
Empowering users to revisit and modify their journal entries enhances the app’s usability and encourages continuous engagement.
Creating the Diary Entries Detail View
When a user selects a day from the calendar, they can view and edit all entries for that date:
import SwiftUI

struct DiaryEntriesView: View {
    let date: Date
    @Environment(\.managedObjectContext) private var viewContext
    @FetchRequest var entries: FetchedResults<DiaryEntryEntity>

    @State private var freeText = ""
    @State private var structuredResponses: [StructuredQuestion: String] = [:]

    init(for date: Date) {
        self.date = date
        _entries = FetchRequest<DiaryEntryEntity>(
            entity: DiaryEntryEntity.entity(),
            sortDescriptors: [],
            predicate: NSPredicate(format: "date >= %@ AND date < %@", Calendar.current.startOfDay(for: date) as NSDate, Calendar.current.date(byAdding: .day, value: 1, to: Calendar.current.startOfDay(for: date))! as NSDate)
        )
    }

    var body: some View {
        NavigationView {
            List {
                Section(header: Text("Free Writing")) {
                    TextEditor(text: $freeText)
                        .padding()
                }

                ForEach(StructuredQuestion.allCases, id: \.self) { question in
                    Section(header: Text(question.rawValue)) {
                        TextField("Your answer...", text: Binding(
                            get: { structuredResponses[question] ?? "" },
                            set: { structuredResponses[question] = $0 }
                        ))
                        .padding()
                        .background(Color(.secondarySystemBackground))
                        .cornerRadius(8)
                    }
                }
            }
            .listStyle(GroupedListStyle())
            .navigationTitle(formattedDate())
            .navigationBarItems(trailing: Button("Save") {
                updateEntries()
            })
            .onAppear {
                loadEntries()
            }
        }
    }

    func loadEntries() {
        // Load existing entries for the day
        for entry in entries {
            freeText += entry.freeText ?? ""
            for structured in entry.structuredQuestions ?? [] {
                if let question = StructuredQuestion(rawValue: structured.question ?? ""),
                   let response = structured.response {
                    structuredResponses[question] = response
                }
            }
        }
    }

    func updateEntries() {
        // Delete existing entries for the day
        for entry in entries {
            viewContext.delete(entry)
        }

        // Create a new entry with updated data
        let newEntry = DiaryEntryEntity(context: viewContext)
        newEntry.id = UUID()
        newEntry.date = date
        newEntry.freeText = freeText
        newEntry.sentimentScore = analyzeSentimentScore(for: freeText)

        // Save structured responses
        for (question, response) in structuredResponses {
            let structured = StructuredResponseEntity(context: viewContext)
            structured.question = question.rawValue
            structured.response = response
            newEntry.addToStructuredQuestions(structured)
        }

        do {
            try viewContext.save()
        } catch {
            print("Failed to update entry: \(error.localizedDescription)")
        }
    }

    func formattedDate() -> String {
        let formatter = DateFormatter()
        formatter.dateStyle = .full
        return formatter.string(from: date)
    }
}
This view allows users to review and modify their entries, ensuring their journal remains accurate and reflective of their true experiences.
Securing Data with Core Data
To maintain data integrity and ensure that users' diary entries are reliably stored across sessions, integrating Core Data is essential.
Setting Up Core Data Entities
Define two primary entities: DiaryEntryEntity and StructuredResponseEntity.
-
DiaryEntryEntity:
- Attributes:
-
id: UUID
-
date: Date
-
freeText: String
-
sentimentScore: Double
-
- Relationships:
-
structuredQuestions: To-Many relationship with StructuredResponseEntity
-
- Attributes:
-
StructuredResponseEntity:
- Attributes:
-
question: String
-
response: String
-
- Relationships:
-
diaryEntry: To-One relationship with DiaryEntryEntity
-
- Attributes:
Managing Core Data in SwiftUI
Ensure that your main view handles data fetching and saving seamlessly:
import SwiftUI
import CoreData

struct ContentView: View {
    @Environment(\.managedObjectContext) private var viewContext

    @FetchRequest(
        sortDescriptors: [NSSortDescriptor(keyPath: \DiaryEntryEntity.date, ascending: true)],
        animation: .default)
    private var diaryEntriesEntities: FetchedResults<DiaryEntryEntity>

    @State private var journalEntry: String = ""
    @State private var reflectionPrompt: String = ""

    var diaryEntries: [DiaryEntry] {
        diaryEntriesEntities.map { entry in
            DiaryEntry(date: entry.date ?? Date(),
                       text: entry.freeText ?? "",
                       structuredResponses: Dictionary(uniqueKeysWithValues: (entry.structuredQuestions ?? []).compactMap {
                           guard let key = StructuredQuestion(rawValue: $0.question ?? "") else { return nil }
                           return (key, $0.response ?? "")
                       }),
                       sentimentScore: entry.sentimentScore)
        }
    }

    var body: some View {
        NavigationView {
            VStack {
                CalendarView(diaryEntries: diaryEntries)
                    .padding()

                LegendView()
                    .padding()

                // Rest of the ContentView...
            }
            .navigationTitle("My Diary")
        }
    }
}
This setup ensures that all diary entries are fetched and displayed accurately, leveraging Core Data's robust data management capabilities.
Enhancing Accessibility and User Experience
Creating an accessible and user-friendly app is crucial for broad user adoption and satisfaction.
Ensuring Color Accessibility
Choose color palettes that are distinguishable for users with color vision deficiencies. Incorporate patterns or icons alongside colors for clearer mood representation:
struct DayView: View {
    let date: Date
    let dayMoods: [DayMood]
    @State private var showEntries = false

    var body: some View {
        let dayMood = dayMoods.first(where: { Calendar.current.isDate($0.date, inSameDayAs: date) })
        let color = dayMood?.moodColor ?? Color.clear
        let dayNumber = Calendar.current.component(.day, from: date)

        Button(action: {
            if dayMood != nil {
                showEntries = true
            }
        }) {
            Text("\(dayNumber)")
                .font(.subheadline)
                .frame(width: 30, height: 30)
                .background(dayMood != nil ? color : Color.clear)
                .clipShape(Circle())
                .foregroundColor(dayMood != nil ? .white : .primary)
        }
        .sheet(isPresented: $showEntries) {
            DiaryEntriesView(for: date)
        }
        .accessibilityLabel("\(dayNumber), \(dayMood?.moodDescription ?? "No entries")")
    }
}
Adding a Legend
Provide users with a legend explaining the color meanings to improve understanding:
struct LegendView: View {
    var body: some View {
        VStack(alignment: .leading, spacing: 5) {
            HStack {
                Circle().fill(Color.green).frame(width: 15, height: 15)
                Text("Very Positive 😊")
            }
            HStack {
                Circle().fill(Color.yellow).frame(width: 15, height: 15)
                Text("Positive 🙂")
            }
            HStack {
                Circle().fill(Color.gray).frame(width: 15, height: 15)
                Text("Neutral 😐")
            }
            HStack {
                Circle().fill(Color.orange).frame(width: 15, height: 15)
                Text("Negative 🙁")
            }
            HStack {
                Circle().fill(Color.red).frame(width: 15, height: 15)
                Text("Very Negative 😞")
            }
        }
        .padding()
        .background(Color(.systemBackground))
        .cornerRadius(8)
        .shadow(radius: 5)
    }
}
Integrate the
LegendView
into your main diary view to provide immediate context to users.
Visualizing Data with a Flowchart
Understanding the flow of data and user interactions helps in both development and user comprehension.
[User Authentication]
         |
         v
[MainDiaryView] --- [ConsolidatedInsightsView]
         |
         v
[Diary Entry: Free Text + Structured Responses]
         |
         v
[Sentiment Analysis]
         |
         v
[Save to Core Data]
         |
         v
[Generate Day Moods]
         |
         v
[Update Calendar with Color-Coded Moods]
Figure 1: Overview of the App's Enhanced Features and Data Flow
Final Thoughts
By integrating user authentication, sentiment analysis, structured and free-form journal entries, a color-coded calendar, editable entries, and consolidated insights, your iOS diary app will offer users a comprehensive and engaging platform for self-reflection and emotional tracking. Incorporating affiliate marketing through consolidated insights not only adds functionality but also opens avenues for monetization. Prioritizing accessibility and data privacy further enhances user trust and satisfaction, making your app a valuable tool in their personal growth journey.
References
- Apple Inc. (2023). SwiftUI Documentation. Retrieved from https://developer.apple.com/docu...
- Firebase. (2023). Firebase Authentication Documentation. Retrieved from https://firebase.google.com/docs...
- Hammer, J., & D'Eon, J. (2020). Core ML in iOS: A Real-World Guide to Machine Learning with Swift. Manning Publications.
- Norman, D. (2005). Emotional Design: Why We Love (or Hate) Everyday Things. Basic Books.
- Apple Inc. (2023). Core Data Programming Guide. Retrieved from https://developer.apple.com/libr...
![[100-Day AI bootcamp] Day 8: Financial Data Assistant](https://growgrow.s3.us-east-2.amazonaws.com/media/blog_images/5321738902254_.pic.jpg)
![[100-Day AI bootcamp] Day 32: Flashcard Generator](https://growgrow.s3.us-east-2.amazonaws.com/media/blog_images/4421737105713_.pic.jpg)
![[100-Day AI bootcamp] Day 9: AI Resume Builder](https://growgrow.s3.us-east-2.amazonaws.com/media/blog_images/4231736341062_.pic.jpg)
![[100-Day AI bootcamp] Day 8: AI generated Children book web app](https://growgrow.s3.us-east-2.amazonaws.com/media/blog_images/4221736329152_.pic.jpg)
![[100-Day AI bootcamp] Day 7: Short Text social media App](https://growgrow.s3.us-east-2.amazonaws.com/media/blog_images/4211736248200_.pic.jpg)
![[100-Day AI bootcamp] Day 2: Building a Real-Time Chatroom with Django](https://growgrow.s3.us-east-2.amazonaws.com/media/blog_images/4201736241999_.pic.jpg)
![[100-Day AI bootcamp] Day 1: AI-Powered Blog](https://growgrow.s3.us-east-2.amazonaws.com/media/blog_images/4161736157861_.pic.jpg)
![[100-Day AI bootcamp] Day 22: Movie Recommendation and Sentiment Analysis Web App](https://growgrow.s3.us-east-2.amazonaws.com/media/blog_images/4151736154176_.pic.jpg)

Comments
Please log in to leave a comment.
No comments yet.